
In today’s increasingly virtual workspace, there are few strangers to video chat meetings. Yet for many, the problems remain the same. You can hear them but they can’t hear you. Sharing the wrong screen. Playing a video clip but the audio is distorted for everyone else. We’ve all been there. But while virtual meetings are the new norm, technical difficulties don’t have to be.
Knowing how to use your video chat platform effectively will help you ensure a professional presentation, avoid wasted time and frustration, streamline workflows and engage attendees better.
With over 42% market share in the United States, Zoom has led the video conferencing surge and continues to grow. In our virtual meeting blog series, we’ll go over tips for using popular platforms so you can take full advantage of helpful features.
Quick Links
- Schedule and invite
- Join a meeting
- Meeting controls & viewing
- Keyboard shortcuts
- Set-up a waiting room
- Collaborate with annotations
- Share audio when playing a video
- Require registration for virtual event
- Leverage a dual monitor set-up
- Breakout rooms and hand raising
- Record and save meetings
- Improve audio and video
How to use Zoom
Schedule and Invite
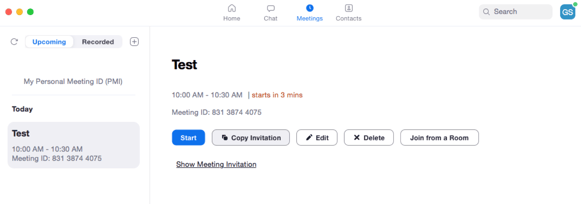
While anyone can join a Zoom meeting, you’ll need to sign up for a Zoom account to host one. Evaluate if you’ll need a paid plan option and then create your account and select Schedule a Meeting. After you’ve set up and saved your meeting, invite others by going to your Meetings and click Copy Invitation. Simply paste the invitation into an email or anywhere else to send it out.
Join a meeting
If you’re using the web browser, go to Zoom.us and click Join a Meeting at the top right. Enter the Meeting ID and when the system dialog prompts, click Open zoom.us. Change your default Display Name if desired and select if you want to join with or without video (these settings can be changed at any time during the meeting).
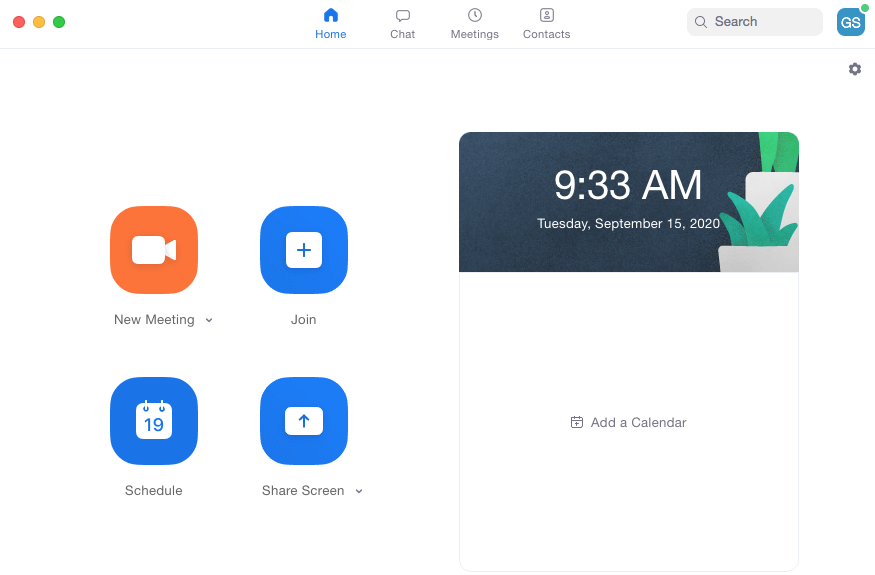
If you’re using the Zoom Desktop or Mobile App, open the app, sign in, select Join and change your default Display Name if desired. If you are hosting the meeting, select Meetings at the top of the window to start your meeting.
Meeting Controls and Viewing Options
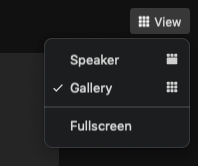
If there are more than three participants, Active Speaker View will show the speaker in the biggest window, with everyone else in smaller windows at the top. Gallery view will show all participants (up to 49 thumbnails on desktop), with arrow options to display the next page of participants if necessary.
Use the toolbar at the bottom of the screen to change your audio or visual settings, view participants, open the chat, share your screen, record the meeting and more.

Here are 9 lesser-known Zoom features that will make your meetings much more effective.
1. Set up quick keyboard shortcuts.
Respond quicker and present content seamlessly without having to find and click the right button. Below are some of Zoom’s default keyboard shortcuts.
| For Mac | Keyboard Command | For Windows |
| Cmd + Shift + S | Start/stop screen share | Alt + S |
| Cmd + Shift + V | Turn your video on/off | Alt + V |
| Cmd + Shift + A | Mute/unmute your audio | Alt + A |
| Cmd + Shift + M | Mute audio for everyone except host (only works if you're the host) | Alt + M |
| Cmd + Shift + R | Start/stop recording | Alt + R |
Any shortcut can be changed by going to Keyboard Shortcuts within your Zoom Settings (Note: Zoom Desktop Client or the mobile app needs to be downloaded to your device to access these settings). For example, maybe you only want to press Cmd + S to share a screen instead of Cmd + Shift + S. Simply click a shortcut to edit it, and enter whichever key/s you want to use for the command instead.
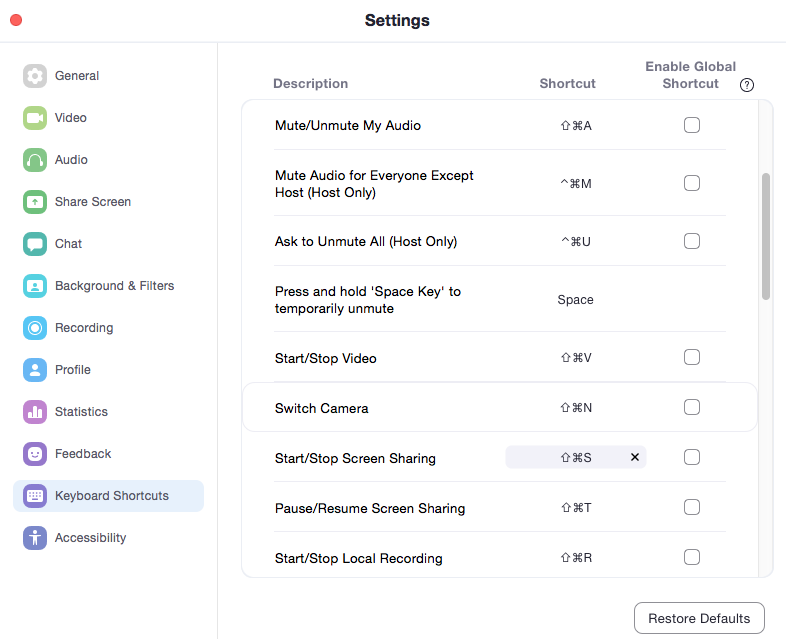
Check the box for Enable Global Shortcut if you want the shortcut to work even if you’re not in the Zoom window. This is helpful if you’re in an application such as Adobe PDF during a call and want to quickly share your screen without having to find and reopen the Zoom window.
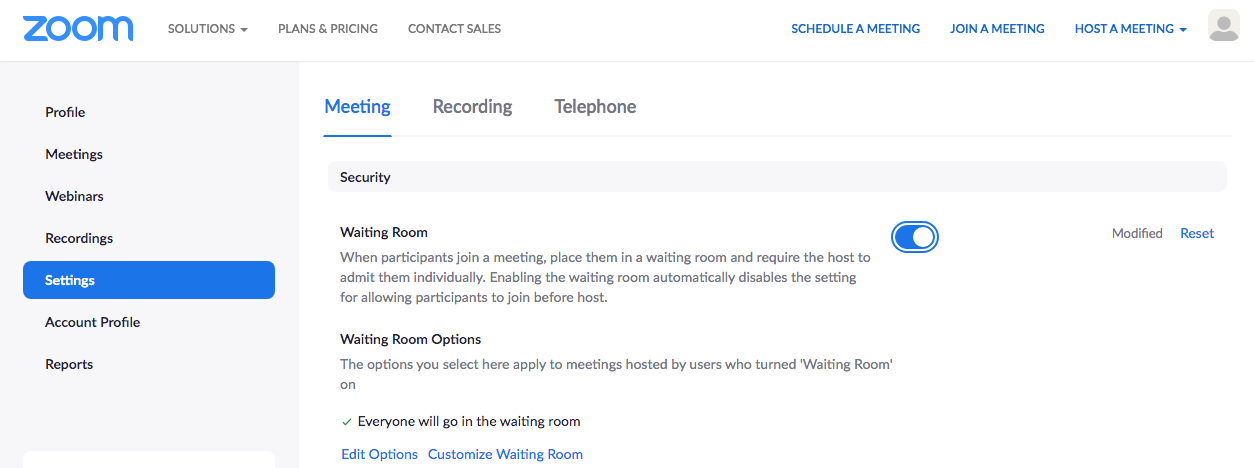
2. Create a virtual waiting room.
People can attend Zoom meetings early, regardless if the host is present or not. But in some cases this could be bad form, such as if you’re hosting a meeting where participants don’t know each other or interviewing a candidate along with others on your team. Enable the waiting room feature when creating a meeting to admit everyone at the same time or as you see fit, so you can make any necessary introductions and eliminate unwanted discussions before you join.
This can also be an additional security component to ensure nothing private or confidential is discussed by early attendees in front of someone who joined the meeting without them noticing. You can also require the waiting room for certain guests only, such as attendees outside of your organization.
3. Collaborate on-screen with annotation features.
For meetings where visual content will be shared and discussed—such as wireframes, ad designs or mockups—enable the Annotation feature for attendees. This will let participants provide feedback by drawing, highlighting and adding comments to what’s being shared on-screen. You’ll also be able to see their mouses so they can easily point stuff out to you.
You can save a screenshot of the annotations on-screen at any time by clicking the save button. Enable or disable attendees to save screens as well in the Annotation section within settings.
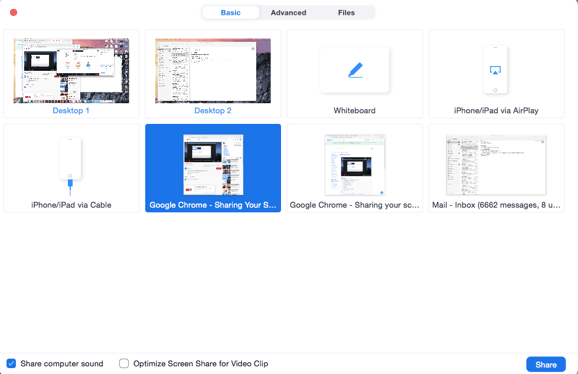
4. Share video audio when showing a video.
When sharing a video during a meeting, it’s critical you share the video’s audio through Zoom or it will sound distorted to others. To share a video, go to the New Share option in the Zoom controls. Check the box in the lower left where it says “Share computer sound”. Then click on the window with the video you want to share.
If possible, turn on closed captioning for the video beforehand, especially for those in a setting where hearing may be hard. If it’s a YouTube video, be sure to watch any beginning ads beforehand so your attendees won’t have to. Check if there are any pop-ups or ad spots during the video as well and make sure they’re all appropriate.
5. Have attendees register for virtual events.
Streamline your workflows when scheduling a webinar or virtual event. Set up a Zoom meeting that requires participants to register before joining by selecting the “Required” checkbox by Registration (you need a Pro account to access this feature). You can customize which form fields you want to be included on the registration page, such as First Name, Last Name, Email Address and Phone Number.
Zoom also enables you to brand the registration page by uploading your logo and an image for the banner at the top. When everyone is done registering, print a report and have all attendee information conveniently in one place.
6. Leverage a dual monitor set-up.
Your screen can become very cluttered during meetings—and when you have many windows and applications open, viewing who’s speaking and the attendee videos is a struggle, especially if a large amount of people are involved. If you have a dual monitor setup you can view a shared screen on one monitor and the participant videos, notes, or any other windows on the other.
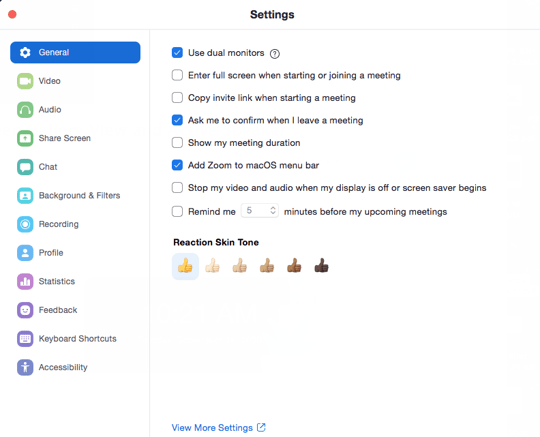
Turn on the dual monitors feature by going to Settings > General, and then checking the box next to “Use dual monitors”. Then participant videos can be arranged on one screen and everything else you’re presenting or viewing on the other.
7. Increase engagement with breakout rooms and hand raising.
Building engagement during a large meeting or virtual event can be a struggle with so many attendees. Manage a large number of people better by giving every person the chance to interact in smaller groups with the breakout room feature. A Zoom meeting can be split into up to 50 separate sessions. The host manages these separate rooms and can assign participants to groups before or during the meeting, and then switch between groups to check-in and answer questions at any time. The separate sessions can be ended by the host, which will trigger a countdown timer before bringing everyone back to the main meeting.
Enabling the Raise Hands feature allows participants to let you know when they have a question or input by clicking the hand symbol in the Zoom toolbar to raise or lower their hand. Explain how this feature works to attendees before starting the meeting to encourage participation and discussions.
8. Record and save meetings automatically.
When watching a demo or collecting feedback from attendees, having a recording of the meeting to reference later can be very helpful. Audio and video from a meeting can be recorded locally to your computer, or if you have a Pro account, saved automatically to the Cloud.
Start, stop or pause the recording at any time during the meeting and disable the recording options for all or select participants if necessary. There’s also an option to record only the audio of a specific participant, which can be helpful if you’re an attendee and only want to save the main speaker’s audio. When you stop and save the recording, Zoom will save a video and audio file (.mp4) and an audio-only file (.m4a) to your computer.
9. Improve your audio and video.
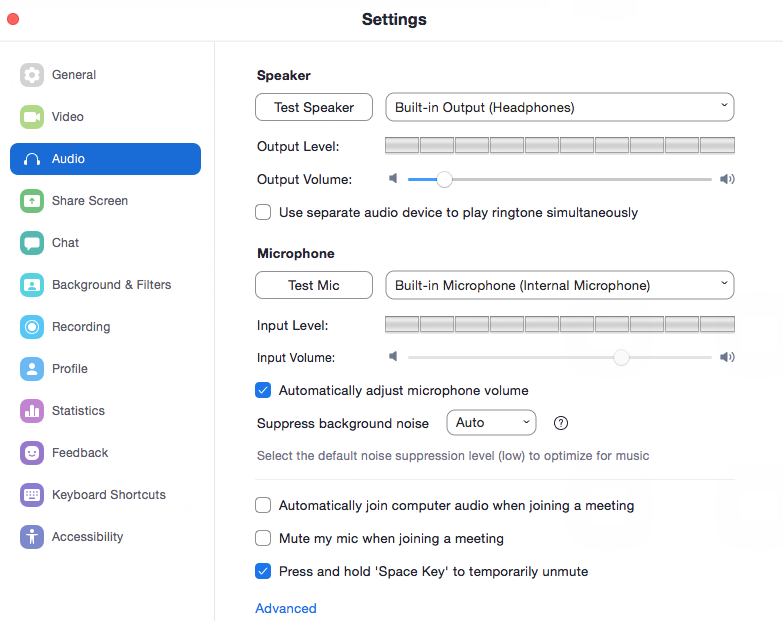
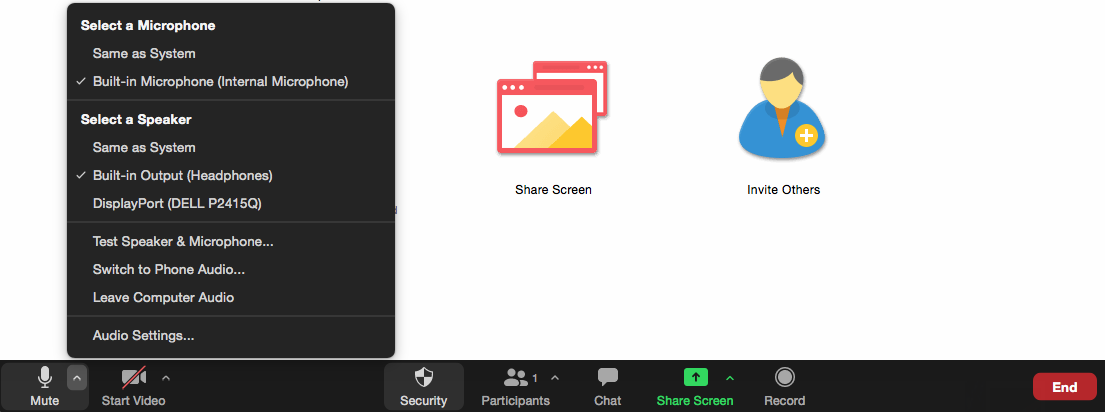
Poor audio and/or video can slow down your meeting and cause frustration. Audio is largely dependent on the room acoustics and microphone—and how the microphone is being used. If you have multiple people in a room sitting in on a call, they are likely distanced from your computer so voices aren’t picked up the best. Having a separate microphone placed in the center of the room instead of using the one on your computer will provide superior audio. Be sure to choose a Zoom supported USB device. When set up, go to Audio settings and select your new audio device (microphone) in the dropdown to ensure that it's used for all future meetings.
Capturing everyone on camera when you’re in a large meeting can be a struggle as well—especially during a pandemic when people in the room need to be socially distanced. Place a separate camera strategically to ensure everyone is visible. When choosing a camera, be sure to take into account the camera’s viewing angle and video quality.
At any time during a meeting, you can click the up arrows next to the Mute and Video options to change the microphone or camera being used.
We hope these 9 tips help your Zoom meetings run smoother and improve your virtual meeting communications.
