January 23, 2025
 Is this image large enough for its intended use? What file type should you send a designer? Why does your image look different printed than it did on your screen?
If you’ve worked in marketing those questions have likely gone back and forth between your team and vendors. Having a basic understanding of image requirements for different applications will help you communicate better—saving time and frustration.
Here’s everything you need to know about images, along with tips for organizing your assets effectively.
Understanding image terminology
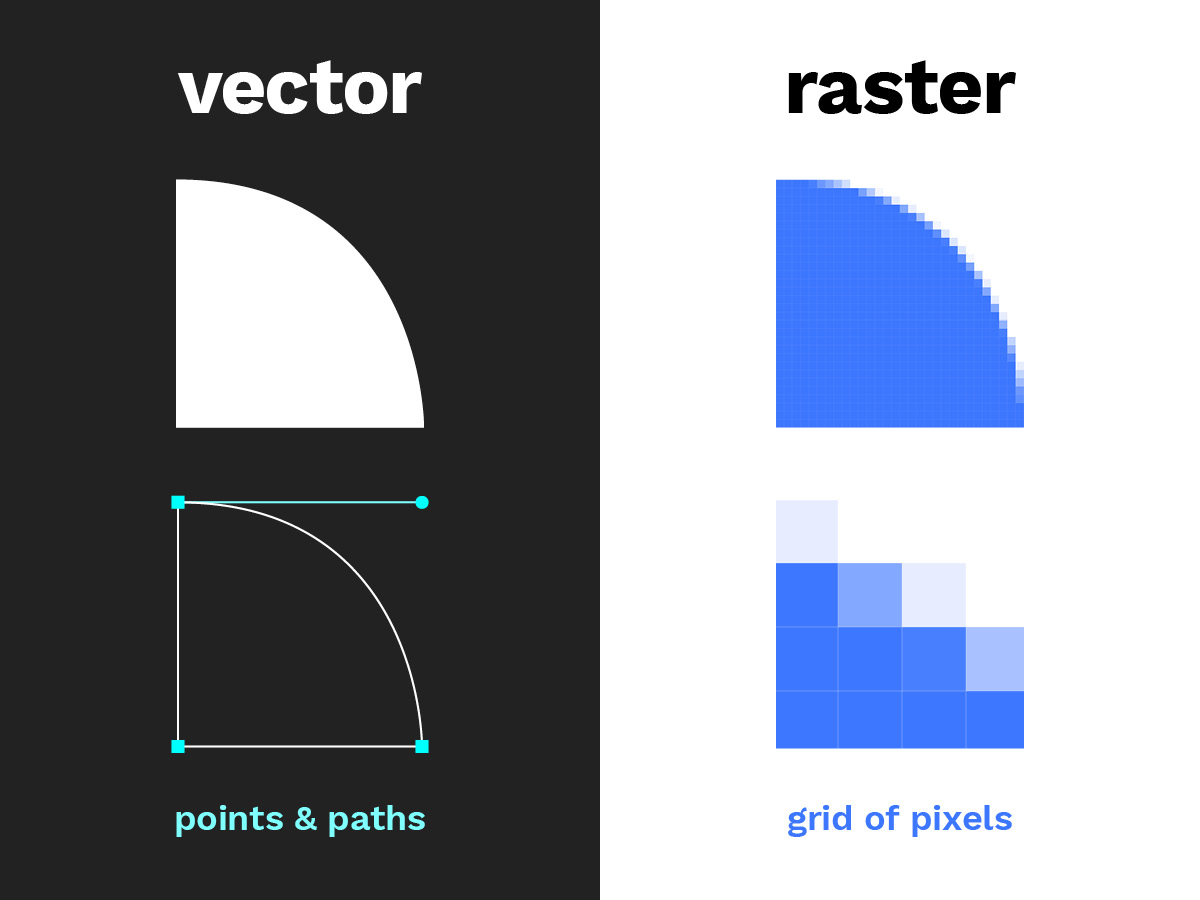
There are two types of digital graphic files—raster and vector. Vector images are composed of shapes created mathematically by points and paths, so detail is not dependent on size. Since vector images can be scaled infinitely without reducing quality, they are the best format for logos, text, icon graphics or illustrations.
Raster images are created by a grid of pixels—rectangular “dots” of a specific color. As a rule of thumb, the higher the number of pixels, the better the image quality and the larger the file size. The native format of any digital camera and used for anything with a digital display, raster images are the most common image type—and therefore will be the focus of this blog post.
File Size
The digital space required to store an image—just like any other kind of digital file—is measured in units of bit (b), byte (B), kilobyte (kB), megabyte (MB), and gigabyte (GB). A variety of factors play into an image’s file size—from as simple as the amount of color and dynamic range represented to as complex as differing encoding and compression methods. This is why images with the same pixel dimensions do not always have the same file size.
Resolution
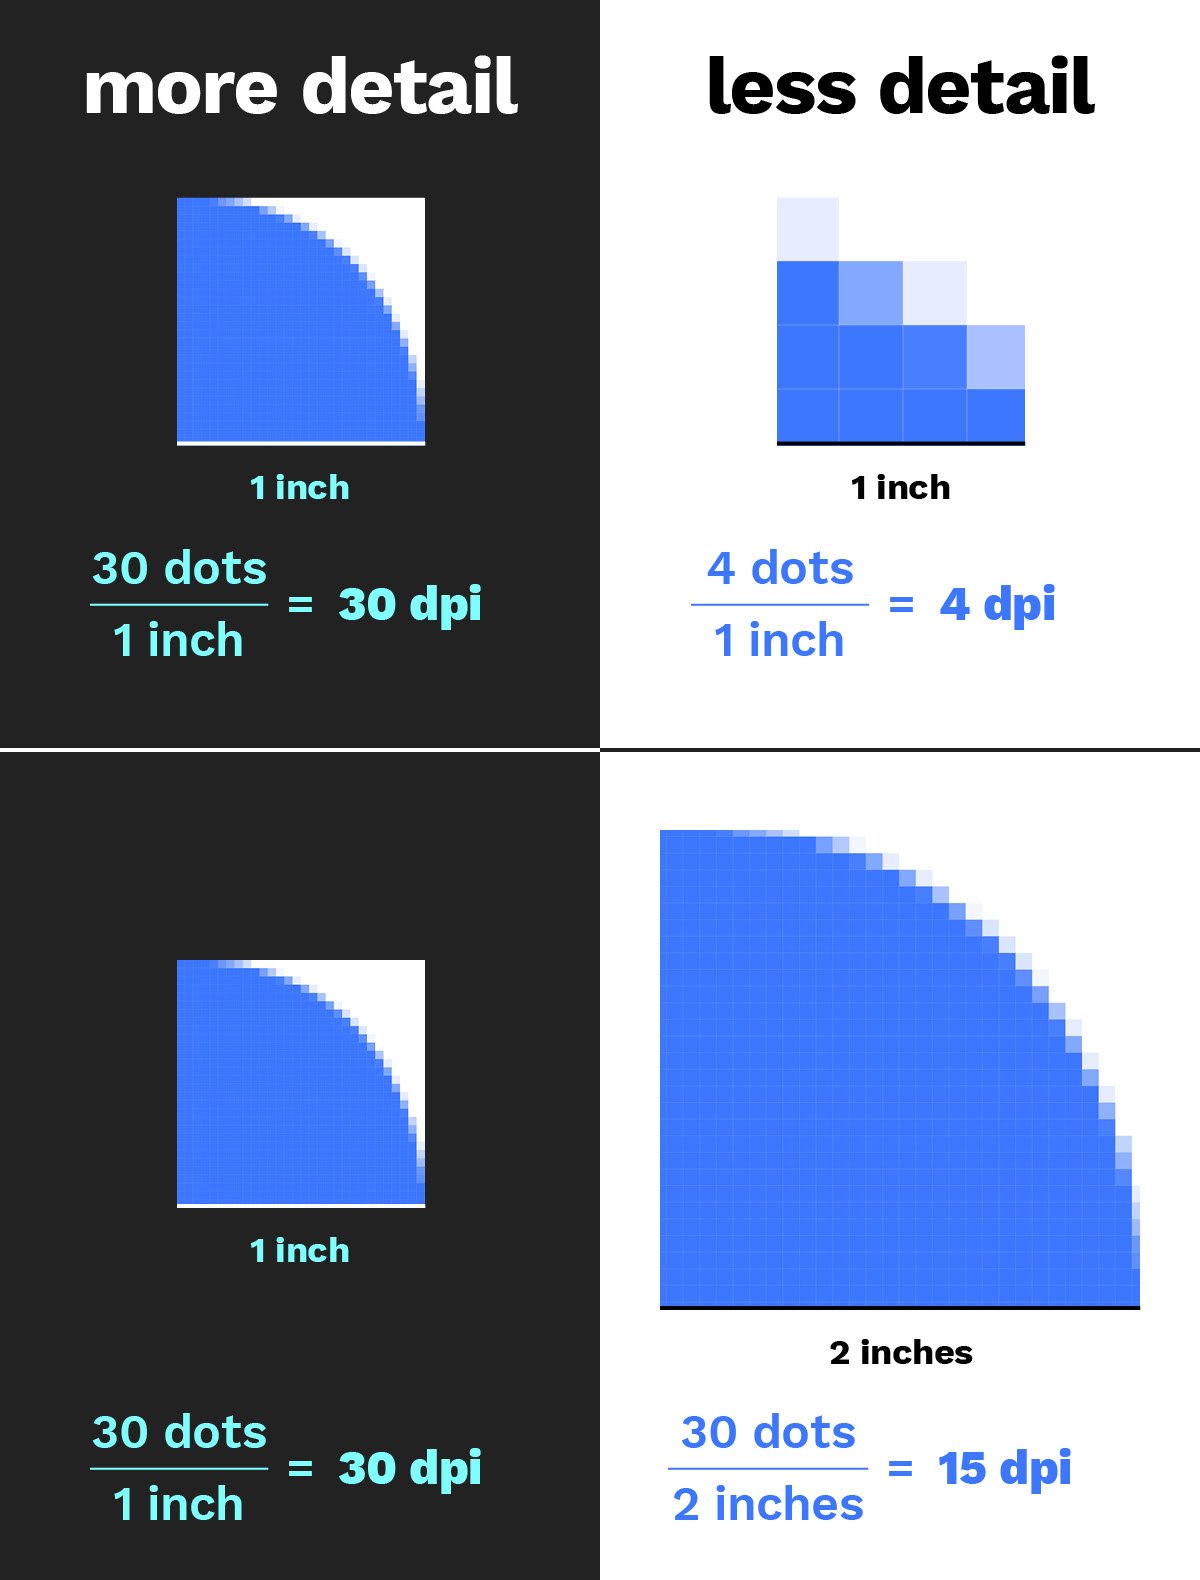
Image resolution is measured in dots per inch (DPI), describing the amount of detail (dots) an image will have per inch when printed. A higher DPI means more “dots” will be printed in every inch, resulting in a crisper, detailed image. Since web browsers render images by pixel dimensions, not inches, DPI is only relevant for printed materials.
Dimensions
Raster images are measured in both inches and pixels, specified as width by height. Pixels are the most literal dimensions of the image. More pixels equals a larger image size. Inches (or millimeters) are arbitrary to pixel dimensions, often used like a map to describe what space an image needs to fit into.
Format
Raster images can be saved and shared in various formats, such as TIFF, PSD, and JPEG, each with its own features, advantages and disadvantages. To learn more, view our quick guide on image file types.
Image requirements per application
Print and digital applications have different image requirements. So how do you know what to ask for or give a vendor? Quick decisions can be made by looking at the dimensions, file size and format. Here are guidelines for determining if a certain image will fit your needs.
For Web
When choosing images for digital applications, such as a website page or digital ad, the most important consideration is the pixel dimensions. This determines whether an image is large enough to use in a specific space without compromising quality. Typically, dimensions no larger than 2,000 pixels for one side is needed. Alternately, an image that is only 300 pixels wide is not going to look very attractive as a full-width webpage header. When in doubt, it is always better to provide a larger image than a smaller one.
Images for the web should only be downsized, never upsized (or resampled larger). If an image is too small, the best solution is to find a larger version of that image, or a different image. Resolution is not relevant for the web, as all web browsers render images by their pixel dimensions and ignore any inch dimensions that are specified.
Image file size is also critical since it has an effect on how fast a web page loads. File sizes should fall in the range of 10kB–1MB. Since compressing images helps reduce file size, high compression formats such as JPG and WebP are common online.
For Print
For print applications, such as a brochure or sell sheet, the dimensions (in inches or millimeters) that an image needs to fit into is the first thing to consider. A sharp high-resolution print generally requires an image resolution of 300 DPI.
For example, if an image needs to be printed 4 inches wide, the image needs to be a minimum of 1,200 pixels wide (4 inches x 300 dots per inch = 1,200 pixels (dots)).
Since images for print need to be higher quality and aren’t compressed, designers often work with large TIFF and PSD files, ranging anywhere between 1MB–100MB.
For Large-format / Display
To maintain image quality in large formats—such as for a poster or tradeshow graphics—digital resampling using enlargement software such as BlowUp or ON1 Resize provides the best results. Note this is the only case in which a raster image should be enlarged.
Since large-format graphics will be viewed from a greater distance, lower resolutions ranging from 100–150 DPI are normally suitable. The file sizes often range from 20MB–2GB in order to cover such large physical spaces.
Managing your assets
The above guidelines help you know what type of image to look for—but how do you know if you even have the right image? If you have to sift through an image library with numerous folders and subfolders, all containing vague file names, the task can seem nearly impossible.
It’s easy for a company’s image library to become disorganized throughout the years, especially when many people from multiple departments are handling files. Keeping your image assets organized is essential to keep marketing efforts running smoothly and streamline content creation.
Here are a few tips for organizing your image library.
- Pick a naming convention and stick with it
- Start by creating categories (products, people, facility, samples, events, etc.)
- Finally, organize by file types (ai, eps, tif, psd, jpg) or application (print vs web)
Remember, it’s never too late to start the organization process—begin today and progress from there. By following these basic image handling guidelines you’ll always know what to look for and find the right image faster.
![10 Google Chrome Features That Are a Big Help [Video Tutorials]](https://blog.mzltd.com/hubfs/Images/chrome-tips-blog-770.jpg)